Are you struggling to make spongy Dhokla at home?
Well, I have been in the same situation on many occasions.
But thankfully, I learned the secret behind this process.
And now, I don’t want you to be in the same place and say why my Dhokla doesn’t turn soft and spongy.
Today, I’m going to share some tips and tricks I discovered while learning the art of making a picture-perfect Dhokla.
So, let’s begin!
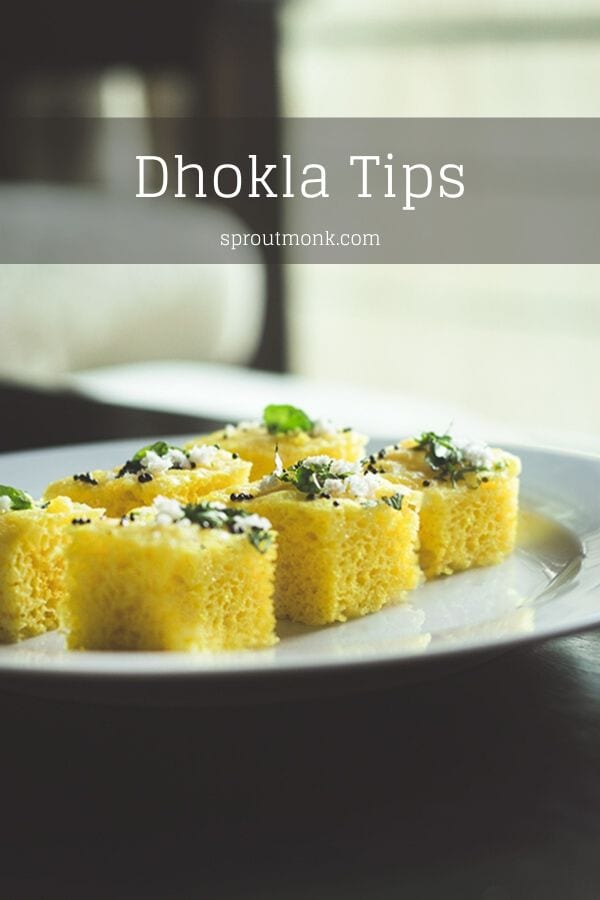
Here’s Why Your Dhokla Doesn’t Turn Spongy
Check out the list of reasons and solutions for your non-spongy Dhokla.
Note: If you are looking for a quick recipe, follow my Khaman Dhokla recipe here.
1. You do not sieve the gram flour
The first rule of making a perfect Dhokla is to sieve the gram flour.
I know many times when we try to make instant Dhokla at home, we skip this process.
But don’t ignore the sieving process.
When you sieve the flour, it helps in removing the lumps from Besan.
The sieving process also helps in the aeration process, which is quite crucial while preparing the batter.
So, don’t forget to sieve the flour.
2. You do not use enough Besan/Gram Flour to prepare the batter
Yes!
Besan flour is the main ingredient of Khaman Dhokla, and you need to use it in generous quantities.
If the proportion of flour is not right, the batter will not ferment properly.
Moreover, raising agents like Baking Soda will also not help in aerating the batter nicely.
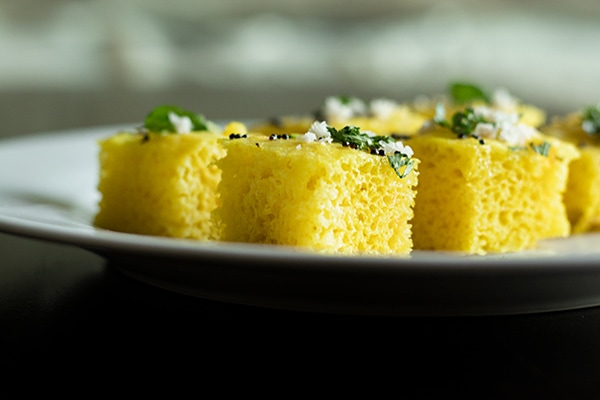
So, if you don’t use enough Besan while preparing the batter, your Dhokla might become soggy and lumpy.
It will not have the same texture that you can see in the above photo.
Since Dhokla-making is more Science than art, you need to be accurate in terms of ingredient proportions.
3. You add too much water to the batter
It is one of the biggest reasons why many people struggle to make spongy and fluffy Dhokla.
If you add a lot of water to the batter, it’s likely to lose its consistency and shape.
And eventually, it won’t become spongy.
In some cases, it may not rise at all.
So, make sure you only add an adequate amount of water while making the batter.
4. You do not mix the batter well
Again a common mistake!
If you don’t mix the batter nicely after adding Soda or Eno, it will not rise properly.
And the Dhokla will also turn red or have patches of red color on the surface.
Sometimes, it happens when you add more Soda to the batter.
But if you don’t mix the batter well, the Dhokla will turn red.
Tip – If you see a few red patches on the Dhokla surface, you can remove them using a serrated knife.
Here’s how:
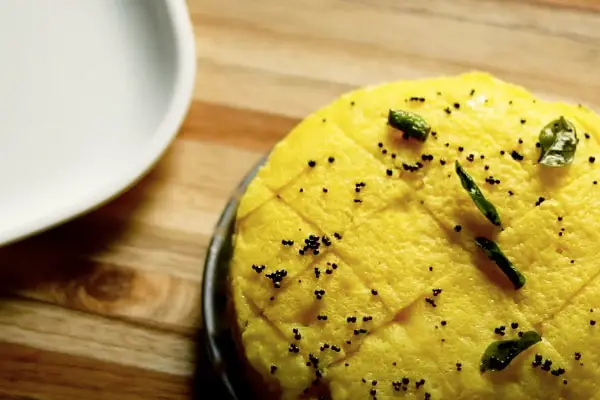
- Place it on a flat surface, and start shaving off the unwanted surface using a serrated knife.
- Once you remove this layer, pour the Tadka on it.
And enjoy!
5. You do not allow the batter to ferment properly
That’s right!
And it doesn’t matter if you are using a readymade packet to prepare the Khaman Dhokla.
You need to allow some resting period after whisking the batter.
In the case of ready mixes, you should allow the batter to rest for at least 3-5 minutes before adding the Baking Soda or Eno.
The resting period helps activate the helpful bacteria, which expedites the aeration process in the batter.
For those who make the batter from scratch, i.e., using Besan flour and no Baking Soda, you need to ferment it for at least 8-10 hours.
Of course, the long fermentation method of Dhokla making doesn’t yield great results each time.
So, I’d suggest you use the Citric Acid and Baking Soda combination.
If you plan to use the raising agents, the 10-minute resting period is more than enough.
You don’t need to rest it for long in this case.
6. You use too much Soda or Eno in the batter
If you use too much Soda or any other raising agents, it won’t serve the purpose.
It won’t make your Dhokla super spongy!
To make soft spongy Dhokla, you will have to use the Baking Soda in appropriate proportions.
Here’s a simple proportion rule:
If you are making a 250 gm Dhokla, you will need half a tablespoon (1/2 tbsp) of Baking Soda or Eno fruit salt.
That’s it!
And you’re good to go.
Like I mentioned earlier, it’s all about Science here.
You only have to follow the proportions correctly to make super spongy Dhokla at home.
7. You use Eno fruit salt to prepare the Dhokla
Even though Eno fruit salt is a great ingredient to raise the Dhokla batter, it may not give you the desired results.
Yes, your Dhokla will become soft and somewhat spongy as well.
But it will not have the same texture.
However, you can fix this problem by using Citric Acid and Baking Soda.
Both these ingredients help a lot in making the same shop-like Dhokla at home.
So, if you want a more porous and fluffy texture, try using these two ingredients instead of Eno fruit salt.
8. You whisk the batter for a long time even after adding the Baking Soda
Don’t do it!
You only need to whisk it for some time while preparing the Besan mixture.
And when you add the raising agents, you need to mix everything gently.
You should make sure all ingredients are incorporated well in the batter.
But again, don’t whisk it for too long.
As soon as you start seeing the smooth and aerated batter, pour the batter into a tray or container and let it steam on high heat.
9. Your steaming time is not right.
Don’t be in a hurry when you steam the Dhokla in a pressure cooker.
The Dhokla batter needs to cook perfectly from all sides.
And the whole process takes about 20 minutes or so.
So, make sure you steam it for at least 20 minutes on high flame.
But how do you know if it’s cooked or not?
Use a knife and poke it inside the steamed Dhokla.
If you’ve followed the process well, the knife should come out clean.
You shouldn’t see any sticky undercooked batter on its edges.
Note – When the steaming is over, allow the cooking pot to cool down for a few minutes.
Once it’s cooled down, you can pour water and tadka over your steamed Dhokla.
10. You do not pour enough water after steaming the Dhokla
Did you know Dhokla rises even more after you pour water over it?
Yes!
The porous texture of Dhokla helps in soaking all water and tadka juices inside the spongy body.
And when it absorbs these juices, it automatically rises a bit in size.
So, pour an adequate amount of water over the steamed Dhokla.
Let it soak in all the juices inside it.
Note – Try to use lukewarm water for this purpose. Do not use cold water, as it might change the texture of your Dhokla later on.
Bonus Tip
Don’t let the batter sit for a long time after adding the Baking Soda or Eno.
It’s the most crucial step in making super spongy Dhokla at home.
Whenever you add Baking Soda or Eno fruit salt to the gram flour mixture, you shouldn’t let it rest for a long time.
You should stir the batter quickly and pour it inside the baking tray.
And then, transfer the tray to the steamer, pressure cooker, or microwave oven.
You need to perform these steps quickly!
Because:
Once the raised batter settles down, you won’t get another opportunity to make it fluffy again.
And if you cook this batter in the steamer, the Dhokla won’t become spongy.
It will remain as it is in the tray, and you won’t get the quintessential texture to it.
In my observation, this type of mistake happens when you are using readymade Dhokla packets.
Each brand comes up with a different method to prepare the batter and steam the Dhokla in the pressure cooker.
And it creates a lot of confusion, especially if you are new to preparing this type of dish.
So, do read the instructions behind the packet carefully.
Check for any special notes at the end of the instructions, and follow their steps and guidelines accordingly.
Hopefully, it should help you make a perfect Dhokla.
What Makes Dhokla Spongy?
When I was a kid, I used to get amazed after seeing these spongy yellow cubes on the display counters of the popular snack shops.
And I always wondered how do they make such a beautiful piece of art in their kitchens.
Eventually, I did learn to make Dhoklas, but I still couldn’t understand ‘the process’ of making this Gujarati snack.
And then, I decided to find more information on how it becomes so spongy after steaming.
After some research and a basic understanding of Chemistry, I finally managed to decode the secret of the Dhokla process.
So, here’s what it takes to turn your Dhokla spongy –
When you whisk the gram flour with other ingredients, it helps in aerating the batter.
Later, the aeration process helps in forming a chemical reaction with raising agents like Baking Soda or Eno.
When you add the Baking Soda, it reacts with acidic elements present in the batter.
And therefore, it quickly inflates the batter consistency and makes it very light and smooth.
So, the moral of the story is –
It’s the chemical reaction between Besan, Raising Agents, and Citric Acid that helps make Dhokla spongy and fluffy.
The Dhokla gets its texture when Carbon Dioxide (CO2) releases into the air as a byproduct of the chemical reaction.
And that’s the real secret!
Now, if someone asks you about the process behind Dhokla, I hope you can answer the question well.
Moving on, let’s quickly look at the following quick tips, which can help in making your Dhokla super spongy each time.
Tips To Make Spongy Dhokla
- In the first mixing stage, you need to stir the mixture thoroughly. Let the air incorporate well inside the batter mix.
- Once the batter is ready, allow it to rest for some time.
- If you are using a ready-mix packet, read the instructions. And follow the steps accordingly.
- If you have a microwave oven, make your Dhokla in it instead of Pressure Cooker or Steamer.
- Don’t forget to steam the batter instantly after your mix the raising agents in it.
- You should always use high flame till the end. Don’t lower the flame or steam on uneven heat. It won’t help in getting the desired results.
- Add enough water in the pressure cooker, as it helps in forming the steam quickly.
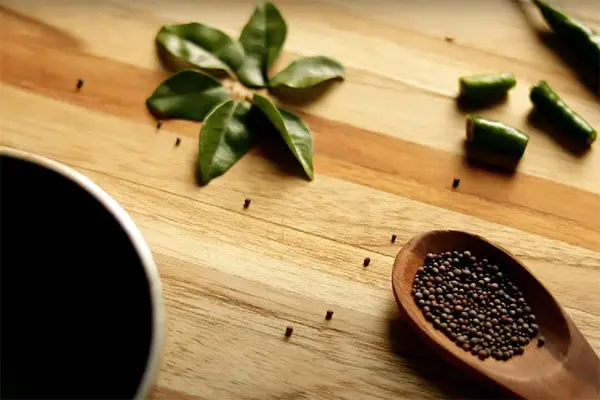
- As mentioned earlier, you must use Citric Acid and Baking Soda combination. And if these ingredients are not available, you may use Eno fruit salt.
- Do not remove the Dhokla from the cooker or steamer immediately. Let it sit inside for a couple of minutes.
- When it’s out on the plate, pour tadka along with warm water over it. Try not to use cold water.
- If the Dhokla is not set, you may put it on the flame again. However, if the Dhokla is not looking fluffy, it won’t help much. You may even burn its base doing so.
Well, that’s how Dhokla can be made spongy!
I think these tips should be helpful in the process of making this delicious snack from Gujarat.
How To Use Non-Spongy Dhokla
Wait, do not throw it away!
I know you might be feeling a bit discouraged and angry after seeing your efforts go in vain.
But as they say, if life gives you lemons, make a lemonade!
It’s perfectly fine to experience such mishaps while cooking, but don’t get discouraged.
Check out the following workaround dishes to use your non-spongy Dhokla.
1. Sev Khamani
Sev Khamani is nothing but a spicy, crumbly mixture of Dhokla.
For this dish, you can simply crumble the Dhokla and place it in a bowl.
Now, prepare the same Dhokla-like Tadka, and pour it over the crumbled pieces.
Mix these pieces well and serve them on a plate.
Next, garnish it with some Nylon Sev, chopped Coriander Leaves, Pomegranate Seeds, Chaat Masala, and Lemon Juice.
And your tasty and delicious Sev Khamani is ready.
Of course, there are many ways to make traditional Surti Sev Khamani.
You can make it using any of your favorite ways.
2. Dhokla Upma
Dhokla Upma is another fabulous dish, which can save the day for you.
It’s pretty similar to making the Bread Upma.
Here’s are the quick instructions:
- Crumble the Dhokla pieces and keep them aside.
- Prepare a Tadka in a Pan.
- Add veggies if you like and cook them thoroughly.
- Once they turn soft, add in the Dhokla pieces and mix well.
- Sprinkle some water on the top and cover it for a couple of minutes.
- Finally, switch off the flame and serve it hot.
For garnish, you can use chopped Coriander Leaves and Nylon Sev.
3. Dhokla Chutney
It is a unique chutney, which goes well with snacks like Vada Pav, Samosa, etc.
Note – You will also need Green Chutney or Tamarind Chutney for this recipe.
Put the Dhokla into a blender and blend it for a very short period until you get a coarse Chutney-like consistency.
Now, take it out in a bowl.
Prepare a Mustard Seeds Tadka and pour it over the blended Dhokla mixture.
Add Green Chutney or Tamarind Chutney to it.
It depends on what type of Chutney you want to make, i.e., Spicy or Sweet.
Mix everything well and serve it with any of your favorite snacks.
You can also add raw Papaya to it.
Well, now, I hope you don’t throw your Dhokla away.
Note – Masala Dhokla is also a famous variety in India, but you need to have well-done Dhokla pieces for this dish.
Over To You
Did you like this guide on making spongy Dhokla at home?
Do let me know in the comments section below.
If you have any more questions regarding this topic, do mention them in your comments.
I will try to answer them as and when possible.
And yes, don’t forget to share this guide with your friends and family.
Lovely tips. If only you had à Youtube Channel, I could have subscribed for more.
Hello. Great tips!
I’ve tried to make Dhokla so many times after following all the tips. It raises when steaming but then collapses when cooked and is really dense. I use a cup of semolina and 2 tablespoons of besan, with 1 teaspoon if Eno. not sure what the pakora consistency should be like or what I’m doing wrong.
Hey there,
I think you’re putting too much baking soda/eno in the batter. Reduce the quantity and mix the batter well before placing it for steaming.
For batter consistency, you can check the video here – https://youtu.be/KSsiJydeIw4?t=78
Thank you. I will try this!
Any idea how to steam dhokla in electric pressure cooker like Ninja Foodie?
Hi Rudi,
Here’s a recipe video to steam dhokla in an electric pressure cooker – https://www.youtube.com/watch?v=_1BP4h9twvA
Hi
I made dhokla, but they were not cooked properly and I cut them. Do I throw these away?
Hey Savita,
If it’s not cooked properly, you can repurpose it into Dhokla Chutney, Sev Khamani, or Dhokla Upma.
I have mentioned these options in detail in the above guide. So, do check them out.
Ma’am is it safe to eat dhokla
Because there is red spots on dhokla?
Hey Riya,
There shouldn’t be any problem with it. You can surely eat it.
Can we replace citric acid with lemon? If yes, what should be the ratio of lemon juice and baking soda?
Hey Pooja,
You can use Lemon Juice, but I’d still suggest you use Citric Acid for Dhokla making process. It gives you the best possible results with Baking Soda or Eno Salt.
I always get a weird taste of baking soda when prepared at home 😔
How not to get that taste?
Hey Divya,
You need to add a souring agent to offset the aftertaste of Baking soda.
Try adding lemon juice or yogurt or buttermilk to the batter. It should help fix this issue for you.
Hi there, really liked your post on making dhokla. I have tried it many times …but it lacks that juicy flavor as we get it from the market ones …can you pls tell me the ratio of water used in making Tarka…some say 2-3 tbsp and some says 1 cup? It’s confusing …pls help
Hey Neetika,
Thanks for the feedback!
You should use a half cup of water for your Tadka if you have prepared 250 gms of Dhokla.
The juiciness, however, depends on the aeration. If your Dhokla is not porous, it will never soak up enough juices.
Hello, thanks for all the useful tips. I too tried many times, i think i dont have judgement of how much quantity of batter should be poured in the tin. So it has no place to raise.
Hey Mayuri,
You can divide the batter into a couple of smaller pots, and it should fix the problem for you.
Do let me know if it works out well!
I tried so many times every time it’s a failure … And now I gave up.. we love to eat dhokala … My question is why dhokala remain half cook surface was a batter and bottom it’s a cooked
Hey Shivani,
First of all, do not give up!
It takes a lot of practice to make perfectly spongy Dhokla at home, and I’m sure you will get there eventually.
Regarding your query, it seems you’re not allowing it to cook thoroughly.
As mentioned in the guide, you will have to cook it for up to 20 minutes if you’re making it in a pressure cooker or steamer.
Alternatively, you can also make use of a Microwave device. In my experience, it gives the best result for your Dhokla preparation.
I hope you find these tips useful. Enjoy!
First time I have made dhokla with enough salt n baking soda. After steaming the dhokla started crumbling while I was trying to cut it. What could be the reason? Instead of cubes, it was all crumble.
Hey Varalakshmi,
It seems you poured a lot of water after steaming your Dhokla.
When you make Dhokla next time, make sure you press the surface with your fingers before pouring water.
If it’s too soft, you don’t have to add more water to it. Otherwise, it’s likely to crumble into pieces.
Thank you for sharing the recipe. Do we not need to add cornflour to the batter? Please reply. Regards.
Hey Rose,
Thank you for the feedback!
As for Corn Flour, you don’t have to add it to your Gram Flour-based (Besan) Dhokla. It won’t make much difference to the fluffy or spongy texture.
However, if you are making Makai ka Dhokla or Makki ka Dhokla, you will surely need to use Corn Flour/Maize Flour instead of Gram Flour.
Hii, i used to make dhokla using curd or buttermilk and eno combination..i have tried dhokla many times using same recipe..it was perfect combination..but nowdays it fails n resulted dhokla becomes hard from bottom..plz give me solution for this failure..
Hey Shweta,
Well, you can do a couple of things in this case.
1. Mix the batter thoroughly before adding Eno into it. You can use a whisker or blender for the aeration process. It will help make your Dhokla soft.
Also, make sure you’ve added enough water to get the right consistency for your batter. It should look like a Pakoda batter.
2. Cook it on high flame for at least 20 mins.
However, the first step is more important to fix your problem. You need to ensure the right batter consistency and accurate timing (and quantity) of Eno addition.
There is one more thing you can do, i.e., heat the pressure cooker or steamer before adding the Eno to the batter.
It will help in steaming the raised batter instantaneously and will also reduce the time wasted between the addition of Eno and the steaming process.
Get these things right, and you should be able to make softer and lighter Dhokla again.
All the best!
Thanks for the reply..will try this tricks and get back to you soon…
But what should be the ratio of citric acid and baking soda? And how much each
Hey Shivali,
Thanks for your question.
You can either use a 1:1.75 or 1:2 ratio for Citric Acid and Baking Soda. Both the ratios work well if you want to make Dhokla at home.
For one cup flour, you can use 1/2 tsp Citric Acid and 1 tsp Baking Soda. I hope it helps you.