In today’s guide, I am going to share some of the best Dosa batter tips for you.
For many years, I struggled to learn the art of making a perfect restaurant-style Dosa at home.
But as I started to dig more into this topic, I realized some of the mistakes I was making while preparing the batter.
And now, I can easily make the crispy and delicious Dosa at home.
So, do you want to know the secrets?
Well, here’s a list of tried and tested Dosa batter tips.
Dosa Batter Tips
In this section, you will find some of the best tips to prepare an excellent Dosa batter at home.
Note – If you are looking for the fermentation tips, do check out the next section here.
Alright, let’s begin!
1. Use Quality Ingredients
Yes, don’t compromise on the quality of batter ingredients.
You should get a good quality of rice, dals, and methi seeds to prepare the batter at home.
If you get sub-standard quality of ingredients, you may still get away with the batter preparation.
However, the taste and texture of your preparations will differ a lot in the end.
You will not be able to get the same restaurant like taste to your Masala Dosa or steamed Idli.
And if you don’t know what to pick for the batter preparation, you can go for this type of Dosa rice or Idli rice.
All these varieties of rice offer the best results while making Dosas at home.
As for dals, you can add a regular split Urad dal to prepare the mixture.
And the same is the case with Fenugreek seeds.
2. Measure Your Ingredients
Dosa mixture is one of those things where you will have to measure the ingredients.
You can’t just add in any quantity of the ingredients you want.
You should measure the ingredients using a food weighing scale, or you can also use the traditional way of using the cups and spoons to measure all ingredients.
I use this weighing scale to measure different ingredients in the kitchen.
But, what’s the right dosa batter proportion?
Here’s a simple breakdown of the ingredient proportions you need for the batter:
2 Cups Rice + 1/2 Cup Urad Dal + 1/3 Cup Poha + 1 Tablespoon Chana Dal + 1/2 Teaspoon Methi Seeds
That’s the proportion you need to use to prepare the batter mixture!
And the above proportion is good enough for a family of 4 people.
3. Rinse The Grains Properly
Once you get the right proportion of ingredients, you can rinse them thoroughly.
Make sure you remove all the dust and other particles from the grains.
While washing the rice, you will need to rinse them 2-3 times, at least.
And you will have to wash them until you see clean water on the surface.
Also, there is no need to use Soda or any such ingredients to rinse the grains.
You just have to use plain water for this process.
4. Use Enough Water For Soaking
As soon as you wash the ingredients, you will have to soak the grains in water.
And when I say soak in the water, you got to make sure the water level is well above all ingredients.
If you do so, it will have enough water for the grains to absorb the water quickly.
Some people do remove water from the bowl after washing the grains.
But that’s not the right thing to do!
You need to have a decent quantity of water inside the bowl to soak the grains completely.
5. Use A Large Bowl To Soak The Grains
Don’t put the grains in a tiny bowl or container.
You need to ensure adequate space for the grains to soak water.
And in this case, a large bowl will help in storing all the grains along with water.
6. Use A Wet Grinder Or Food Processor To Grind The Grains
Although the wet grinder gives excellent results, it may not be feasible for all of us to have this type of equipment at home.
Therefore, you can use any mixer-grinder or food processor to prepare the batter.
It should work just fine.
When you are making the paste, make sure you add a generous amount of water into it.
If you add less water to this mixture, the batter will become thick, and it will be difficult to remove it from the jar.
Also, there is a possibility of overheating the food processor or grinder machine.
So, be careful while using them to prepare the batter.
You should also perform this task in small batches if the mixture quantity is more.
And allow the machine to cool down for some time in between each batch.
7. Add The Soaked Poha To Your Batter
It’s a secret ingredient!
If you want to make crispy Dosas, use Poha or Flattened Rice in your batter.
And the good thing about it is you don’t have to add them in large quantities.
Even a handful amount Poha should do the job for you.
Now, how to use Poha in the batter?
Since Poha doesn’t require a lot of time for the soaking process, you can put it in the water for a few minutes, and it will be ready to go with other ingredients.
Also, do not soak it with other main ingredients.
What type of Poha do you need for this preparation?
You can use any type of Poha as you like.
I like to use Thick Poha (or Jada Poha as we call it in Hindi) for my batter, though.
8. Do Not Use Refrigerator While Fermenting The Batter
The refrigeration process slows down the fermentation.
If you refrigerate the batter, it will take quite a lot of time to ferment properly.
And perhaps, it won’t even ferment in most cases, as the low temperature inside the refrigerator will nearly stop this process.
And therefore, you should avoid storing it in the refrigerator.
9. Store The Batter In A Warm Place For Fermentation
Yes, the bacterias thrive in warmer conditions.
Find a place in your home where the temperatures are a little high.
It could be a place near your sunny window, or it could also be a place in the kitchen itself.
Since I live in Mumbai’s hot and humid weather, I leave it in the kitchen only.
The warm climate here helps in speeding up the fermentation process.
Note – Even though the process requires a warmer environment, do not place it on the burning stove.
It will heat up a lot and might start cooking from inside.
So, avoid doing so at any cost.
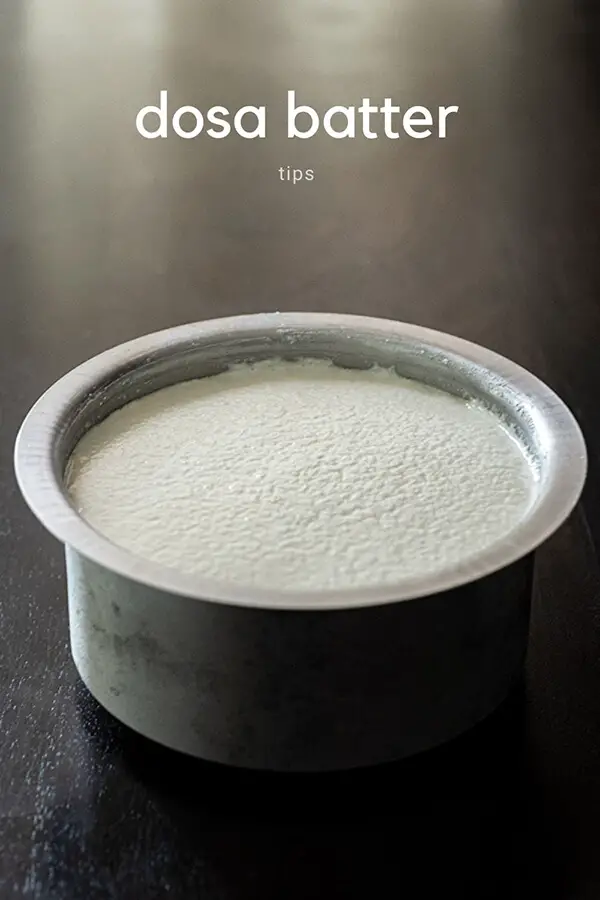
10. Check The Consistency Of The Batter
When you grind the mixture in a grinder, do check the consistency and texture of the batter.
It should look flowy and feel soft to touch.
There shouldn’t be many small half-crushed particles in the batter.
Bonus Tip: Freeze The Batter For Later Use
Yes, freeze it!
If you are not going to use the batter for immediate use, freeze it.
Put it in the freezer.
I follow the same process whenever there is excess batter available.
You can freeze the batter for at least 3-4 days, and it will taste the same.
Later, it may turn a bit sour if the temperature around your place is hot.
But do not throw it away.
You can still use a slightly sour batter to make Masala Dosa, Mysore Masala Dosa, etc.
The masala mixture will balance the sharpness of sour taste considerably.
And that’s it!
Now, head over to the kitchen and start making your batter for the crispy and crunchy Dosas.
Meanwhile, if you want to learn more about the fermentation process, check out the following section.
Dosa Batter Fermentation Tips
The essential part of making any batter or mix is to get the right combination of ingredients.
If you add the right quantity of Rice, Dal, and Water, you shouldn’t be facing many issues with the fermentation process.
Another crucial factor is temperature.
If you are living in a cold environment, your batter will require more time to ferment in such conditions.
On the other hand, it doesn’t as many hours in warm or hot weather conditions.
So, here are some of the tips for you to use while fermenting the dosa batter –
1. Soaking Period
It is the first step to make the dosa batter at home.
And you will have to soak the rice and dals for at least 6 hours.
This period allows the grains to soak in all the water inside.
Also, it helps in activating the beneficial bacterias, which eventually helps in the fermentation process.
Once you soak them for so long, you can move to the next step in this process.
So, make sure you soak your grains for an ample amount of time.
Don’t rush into grinding the grains quickly.
2. Grind Everything Thoroughly
Yes, you need to grind all ingredients thoroughly until it turns into a paste.
Why?
The reason is quite simple.
The bacterias that help in the fermentation process find it difficult to break down the large chunky pieces of grains.
Therefore, if you want to speed up this process, you will have to grind it nicely.
Note – When you grind it into a paste, take the batter on your fingers, and feel the consistency.
If it feels thick and very coarse, grind again with some water.
You can keep it slightly coarse, though.
There is no need to make an extra thin paste of your batter.
3. Fermentation Period
The next thing you need to look at is the fermentation period.
And it’s the most crucial step in making the Dosa batter at home.
Although the fermentation time depends on environmental factors, you still need to keep the batter aside for a minimum period.
And that minimum period is 10-12 hours!
Yes, in general, it should take anywhere between 10-12 hours for the batter to rise nicely.
Therefore, you should let it ferment overnight.
In cold climates, the batter may require more than 12 hours of the fermentation period.
It all depends on how cold the weather is, and you need to adjust the fermentation period accordingly.
Overall, it should take around 16-18 hours for you to prepare a perfect Dosa batter at home.
And it includes 4-6 hours of soaking period.
Well, if you follow the above steps correctly, you should be able to make Dosa batter without any issues.
How To Confirm Batter Fermentation
Use the water method.
You can confirm it by pouring a few drops of batter in a bowl of water.
If the batter floats, you can start making Dosas and Idli.
If it doesn’t float, you will need to wait for some time.
It may need a few minutes or hours to ferment nicely.
There is another way through which you can confirm the fermented batter.
And that is – the appearance.
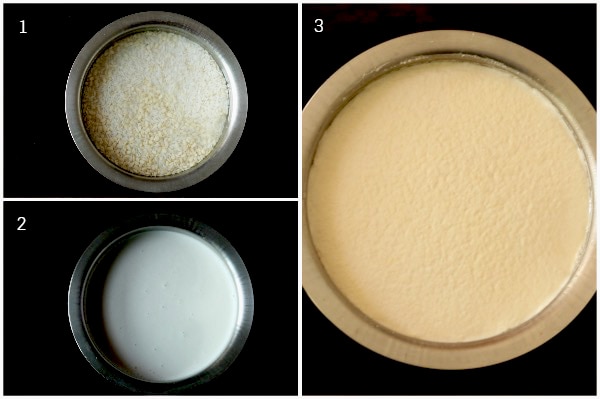
If you can see the batter has risen well, it’s probably ready to start the dosa making process.
Sometimes, you may also see some bubbles and holes in the batter.
And it’s a good indication of the fermented batter.
Note – I’d recommend you to go with the first method only if you’re not a pro at making Dosa batter.
It will give you an idea of how long it takes for the fermentation process to take place at your home.
And once you understand the process, you can easily make out from the appearance of your batter.
You will not have to perform the water test for your fermented batter.
How To Make Perfect Dosa Batter For Ghavan or Neer Dosa
Ghavan/Neer Dosa is a different type of dosa.
It doesn’t require the usual thick batter, which you might have seen or used to make Masala Dosa, Uttapam, etc.
It requires a very thin water-like batter.
So, how do you make this batter for such Dosas?
Here’s the tip that works for me every time –
For this type of batter, you will have to prepare a batter using Surti Kolam rice.
It gives the best results while making Ghavan.
When you grind the mixture for this batter, don’t add too much water.
You only need to add water so that the grinder can make a thin paste out of it.
Once this batter is ready, pour it in a bowl and add more water to it.
And this is where you will have to check the consistency.
You should add water till it gets thin milk-like consistency.
As you reach this type of consistency, stop adding more water to the batter.
Otherwise, it will become too thin.
And more importantly, you won’t be able to form a net-like design on the Dosa.
Now, I hope you can easily use these tips to make your Ghavan batter.
And if you are looking for a detailed step by step recipe, check here.
The above recipe will give you a better idea to make the perfect batter for Ghavan.
Note – If you are using Rice flour, you will still need a similar consistency for the batter.
There is not much difference in the soaked rice batter and rice flour batter.
Both these batters produce the same results in the end.
Over To You
So, there you go!
That’s how I like to make Dosa batter at home.
I use the same tips and techniques to prepare the batter.
And I hope you will find them useful too.
In the meantime, if you have any queries related to the above dosa batter tips, do let me know in the comments section below.
You can also share your favorite method of making Dosa batter in the comment.
And if you liked this detailed guide, do share it with your friends and family.
Hello,
Please suggest, how can make long lasting crispy dosa, which is crispy after packing, i have a dosa stall in hisar, so people’s buy for home.
Thanks
Hey Satender,
I don’t think there is any possible way to keep dosas crispy in the packages. The dosas will lose their texture due to excess steam inside the package.
In my opinion, the only thing you can do is limit the delivery time to 10-15 minutes. Do not cover the places that are too far from your shop.
All the best for your endeavor!
Hello Frnd,
Your tips are so useful ….I can’t say……As like others ..I’m also a big fan of dosa…but now with your tips its in routine now…I hd stopped purchasing batter from market..now after this blog..no more market batter need..Pls help for the tastier and proper measurement rawa dosa also….
Hey Aditi,
Thanks for sharing such valuable feedback!
As for Rava Dosa, you can use a 1:1:1/2 ratio for Rava (Sooji), Rice Flour, and All-Purpose Flour (Maida).
It should help in getting the right crunchy texture to your dosa.
However, make sure you use other ingredients in balanced proportions as well.
I want to make Dosa batter for supply to my extended family and friends. How can I keep it fresh for a longer period say a week or so. As far as possible I don’t want to add any chemical preservative
Hey Raj,
Thanks for your query!
You can keep it in the freezer, but it will still acquire a sour taste after a few days. If you don’t have an issue with such taste, you can surely go ahead with it.
And yes, you should store it in small batches only. Do not store the entire batter in one container.
Still, in my opinion, you should always use the fresh batter for making dosas at home.
Thank for such comprehensive tips ☺️
Hey Sally,
I’m glad you liked these dosa batter tips!